

Work Orders
Work orders track maintenance in AppFolio from the first request through scheduling, completion, and billing. This SOP covers where to find work orders, how to move one through its lifecycle, and how an approved vendor bill closes a work order automatically.
Work Order Lifecycle
Every work order moves through a set of statuses. The happy path runs New to Assigned to Scheduled to Work Done to Completed. Estimates, waiting, and cancellation branch off as needed.
| Status | Meaning | How it is set |
|---|---|---|
| New | Request received, not yet assigned | Auto on resident, internal, or unit turn submission |
| Assigned | Assigned to a vendor and/or internal user | Assign action, usually by the Property Manager or Assistant PM |
| Scheduled | Date and time set for the work | Schedule action |
| Estimate Requested / Estimated | Estimate requested from or received from a vendor | Request or Enter Estimate action. When getting estimates from multiple vendors, do not select a vendor yet |
| Waiting | On hold (parts, access, approval, etc.) | Waiting action |
| Work Done | Physical work finished, not yet billed or closed | Mark Work Done (staff, tech, or vendor). Usually the vendor |
| Ready to Bill | All billable items in, a bill can be created | Mark Ready to Bill action. Rarely needed for vendor jobs, since the approved bill completes the work order |
| Completed | Billed and closed out | Mark Completed, or an approved Smart Bill Entry bill |
| Completed No Need to Bill | Closed with no bill | Mark Completed, then No Bill Needed. Usually the Property Manager |
| Canceled | Work order cancelled | Cancel action |
Where to Find Work Orders
In the left navigation, open Maintenance > Work Orders.
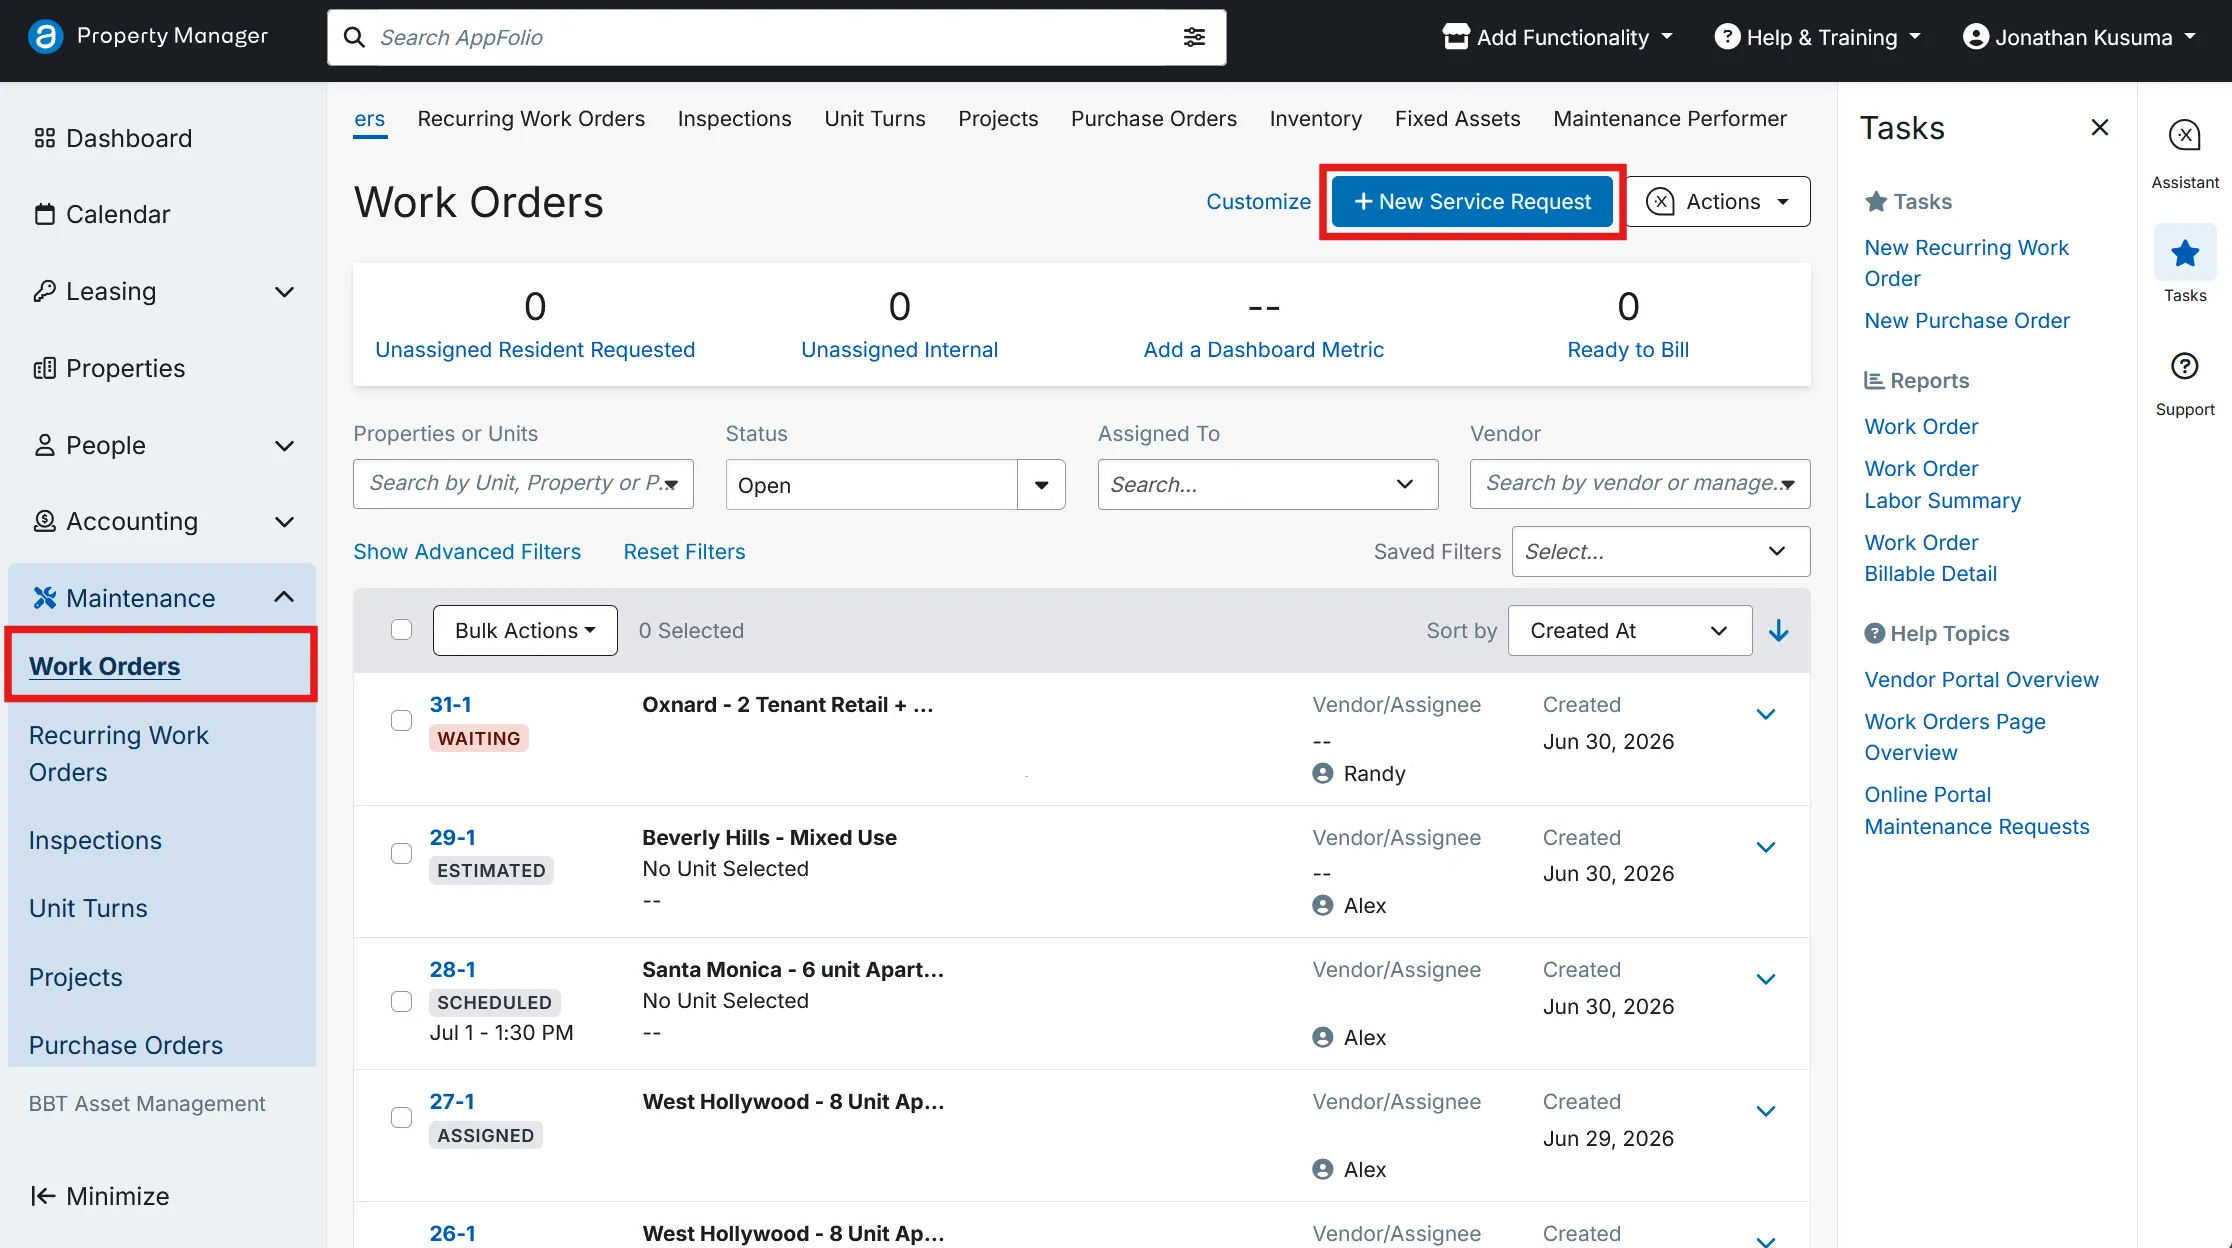
The index page lists every work order and lets you filter, run bulk updates, and use quick actions without opening each one. By default it shows open work orders of all types, newest first.
Create a New Work Order
Click + New Service Request at the top right of the Work Orders page (it is also in the Tasks panel). The property and a description are required. Fill in the rest as needed.
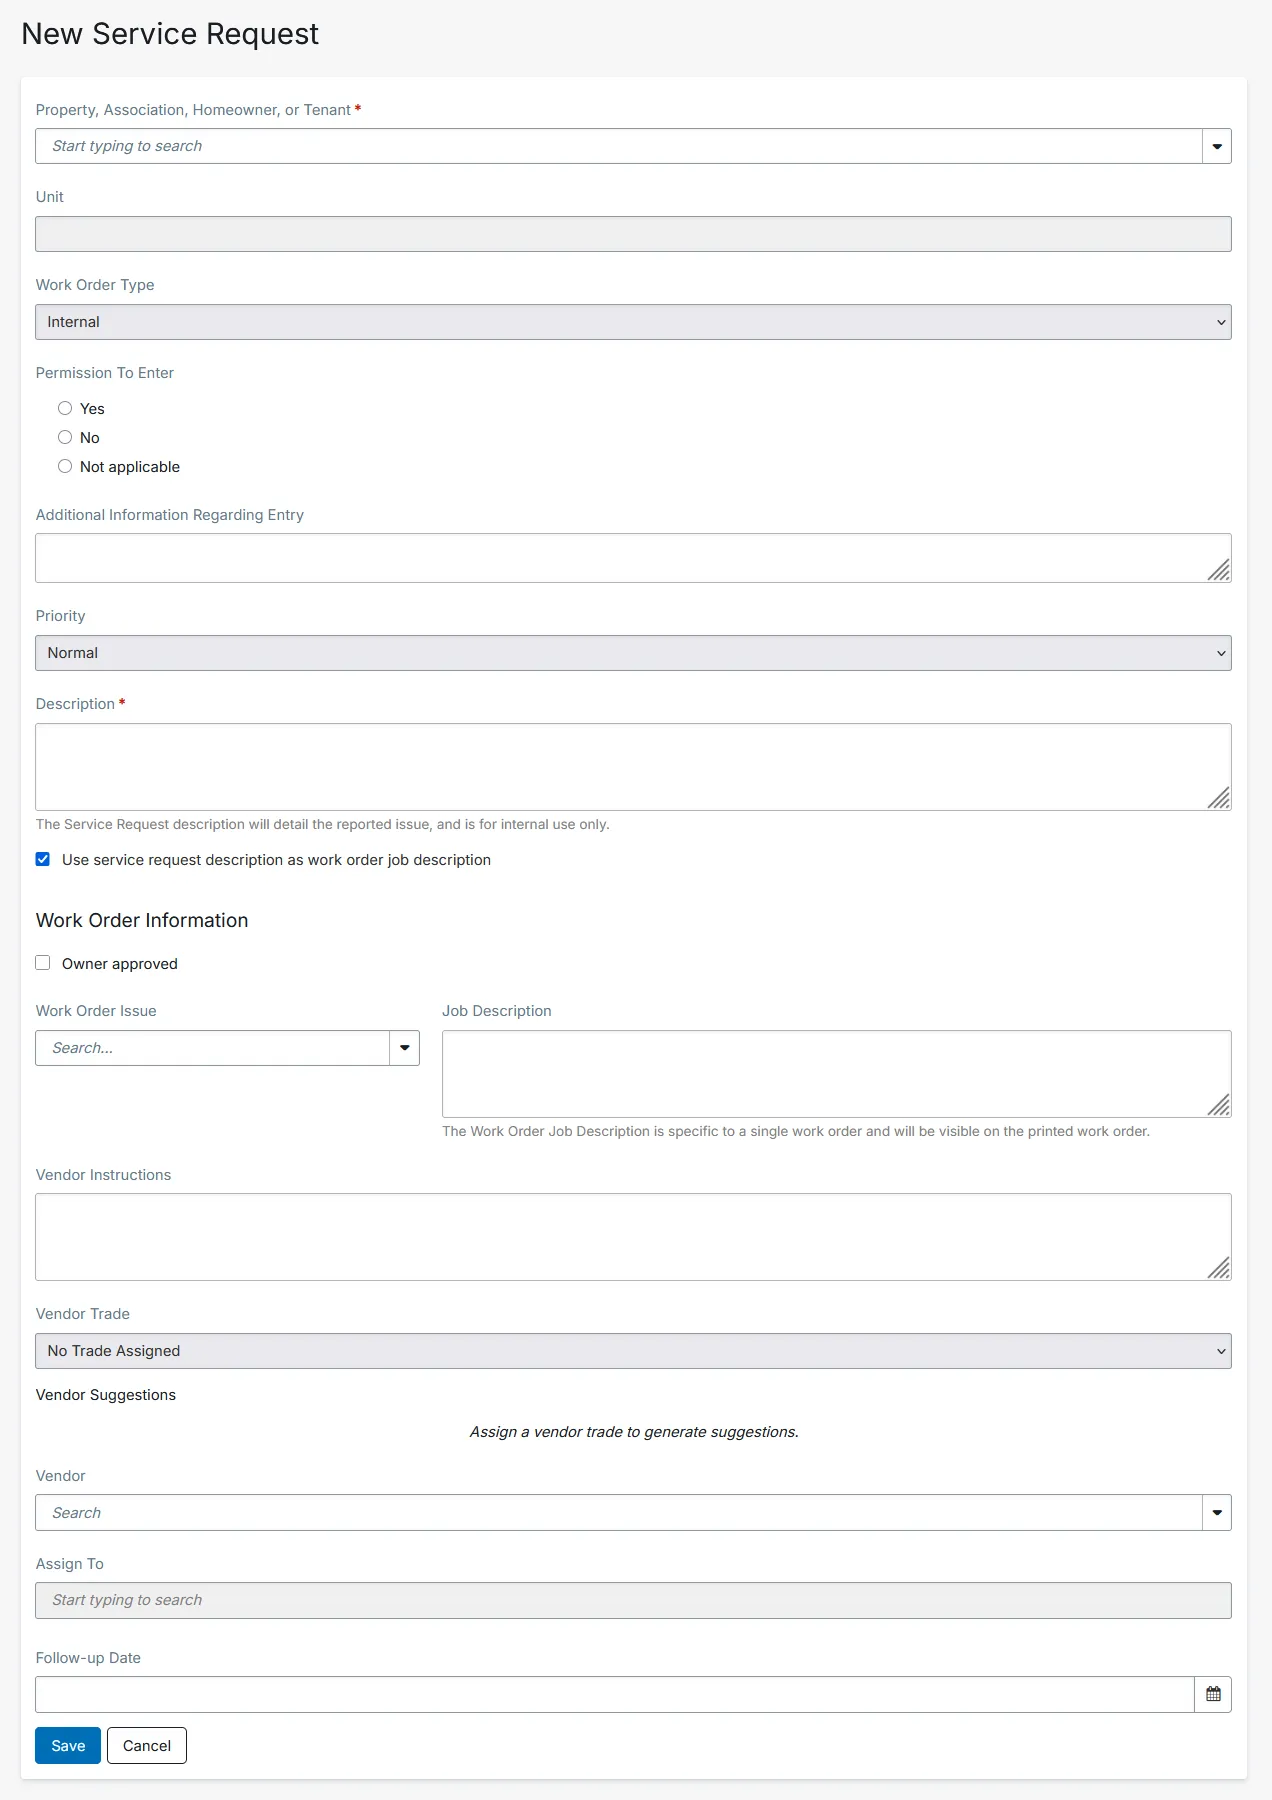
| Field | What to enter |
|---|---|
| Property, Association, Homeowner, or Tenant | Required. Type to search and select. Unit fills in when it applies. |
| Work Order Type | Internal for work initiated in-house, Resident for tenant requests, Unit Turn for turnovers. |
| Priority | Normal, Low, or Urgent. Used for filtering and reports; not shown on printed or emailed work orders. To flag urgency to the vendor, add it to the description or vendor instructions. |
| Description | Required. The work to be done. Keep Use service request description as work order job description checked (recommended) to auto-fill the vendor-facing Job Description, which you can still edit later. Uncheck it only if the vendor should not see the description. |
| Work Order Issue | Category descriptor for filtering and reporting. Editable later from the work order. |
| Vendor Trade | Pick the trade to generate Vendor Suggestions: 1 to 6 vendors ranked by trade, past use at the property, and proximity. |
| Vendor | Pick from the suggestions or search manually. Best practice is to assign a vendor. |
| Assign To | Optional. Sets the status to Assigned. On save the assignee is emailed (if they have the assigned-to-a-work-order notification on) and starts tracking the work order automatically. |
| Follow-up Date | Optional. Sends a reminder on the follow-up date. The person who set it is emailed, and anyone tracking the work order (the assignee auto-tracks) is also notified if they have the follow-up notification on. |
When you select a vendor, three checkboxes appear:
- Email vendor a secure link to view this work order: emails the vendor a Vendor Portal link.
- Text vendor a secure link to view this work order: texts the same link. Not recommended.
- Request vendor to confirm receipt of the work order: lets the vendor accept or reject the job in the Vendor Portal.
Everything else (Permission to Enter, entry notes, Owner approved, Vendor Instructions) is optional. Permission to Enter and entry notes are recommended for all properties.
Click Save. You can then add Notes and Attachments (up to 30 MB each: PDF, JPG, CSV, Excel, and other common formats). The work order lands on the index with a New or Assigned status. If you selected a vendor and left the email option checked, AppFolio emails them the work order on save.
Dashboard Metrics
Four metric tiles sit at the top of the page. Each one counts the work orders that match a filter. Click a tile to apply that filter and see the matching list.
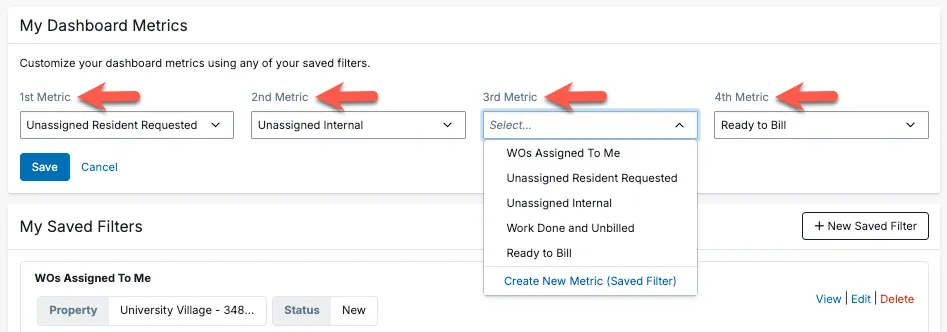
The four default metrics:
- Unassigned Resident Requested: resident requests not yet assigned to a user.
- Unassigned Internal: in-house work orders not yet assigned.
- Resident Requested Without Action in 2 or More Days: open resident requests with no update in 2+ days.
- Completed and Unbilled: work orders marked Work Done but not yet billed.
To change the tiles, click Customize at the top, find the My Dashboard Metrics block, click Edit, and pick a saved filter for each tile.
Filtering and Saved Filters
Click Show Advanced Filters to open the full filter list, then pick criteria on the left (vendor, priority, work order type, and more). The list updates as you go.
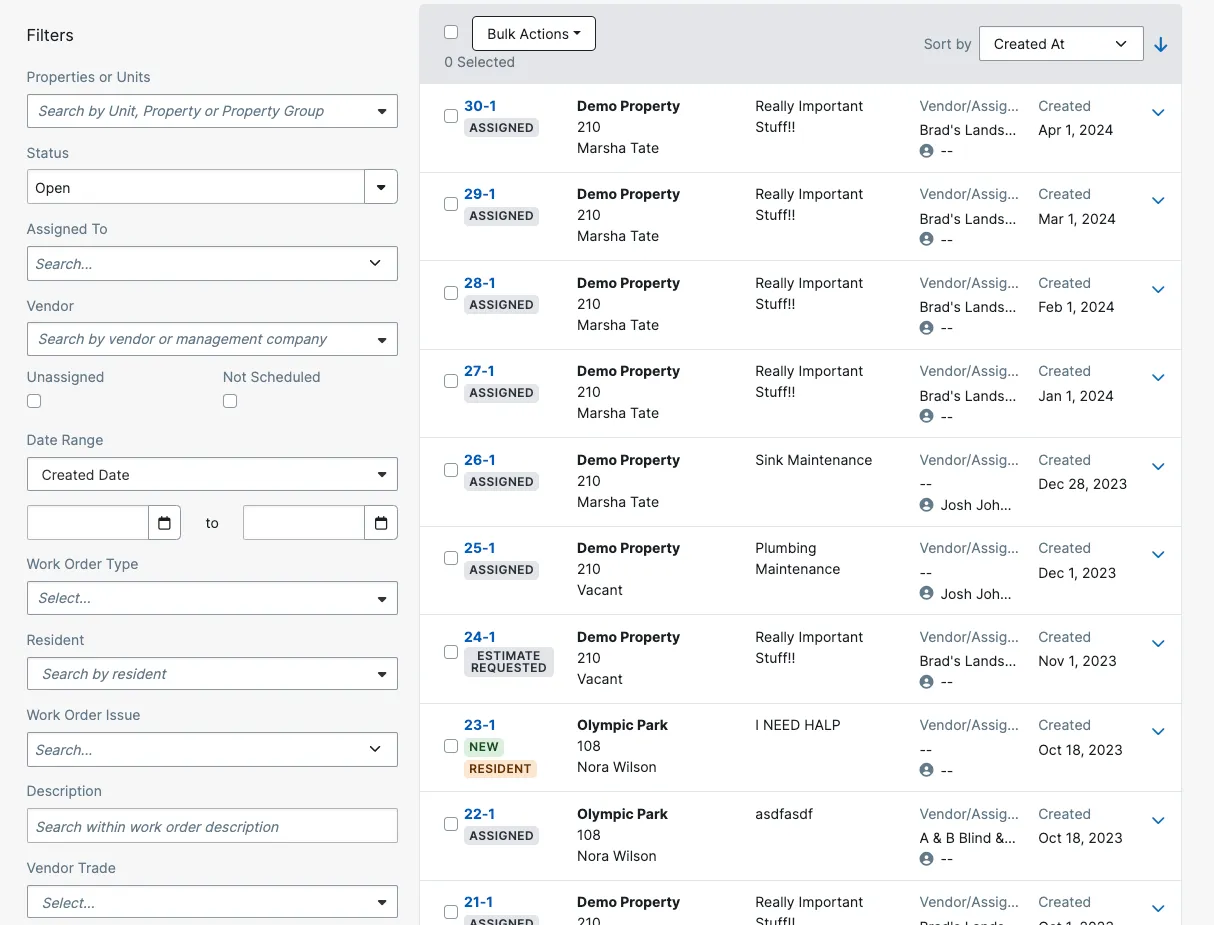
To reuse a view, apply your filters, open the Saved Filters dropdown, and click Create a Saved Filter from Current Filters. Saved filters are tied to your own account and are not visible to other users.
Managing a Work Order
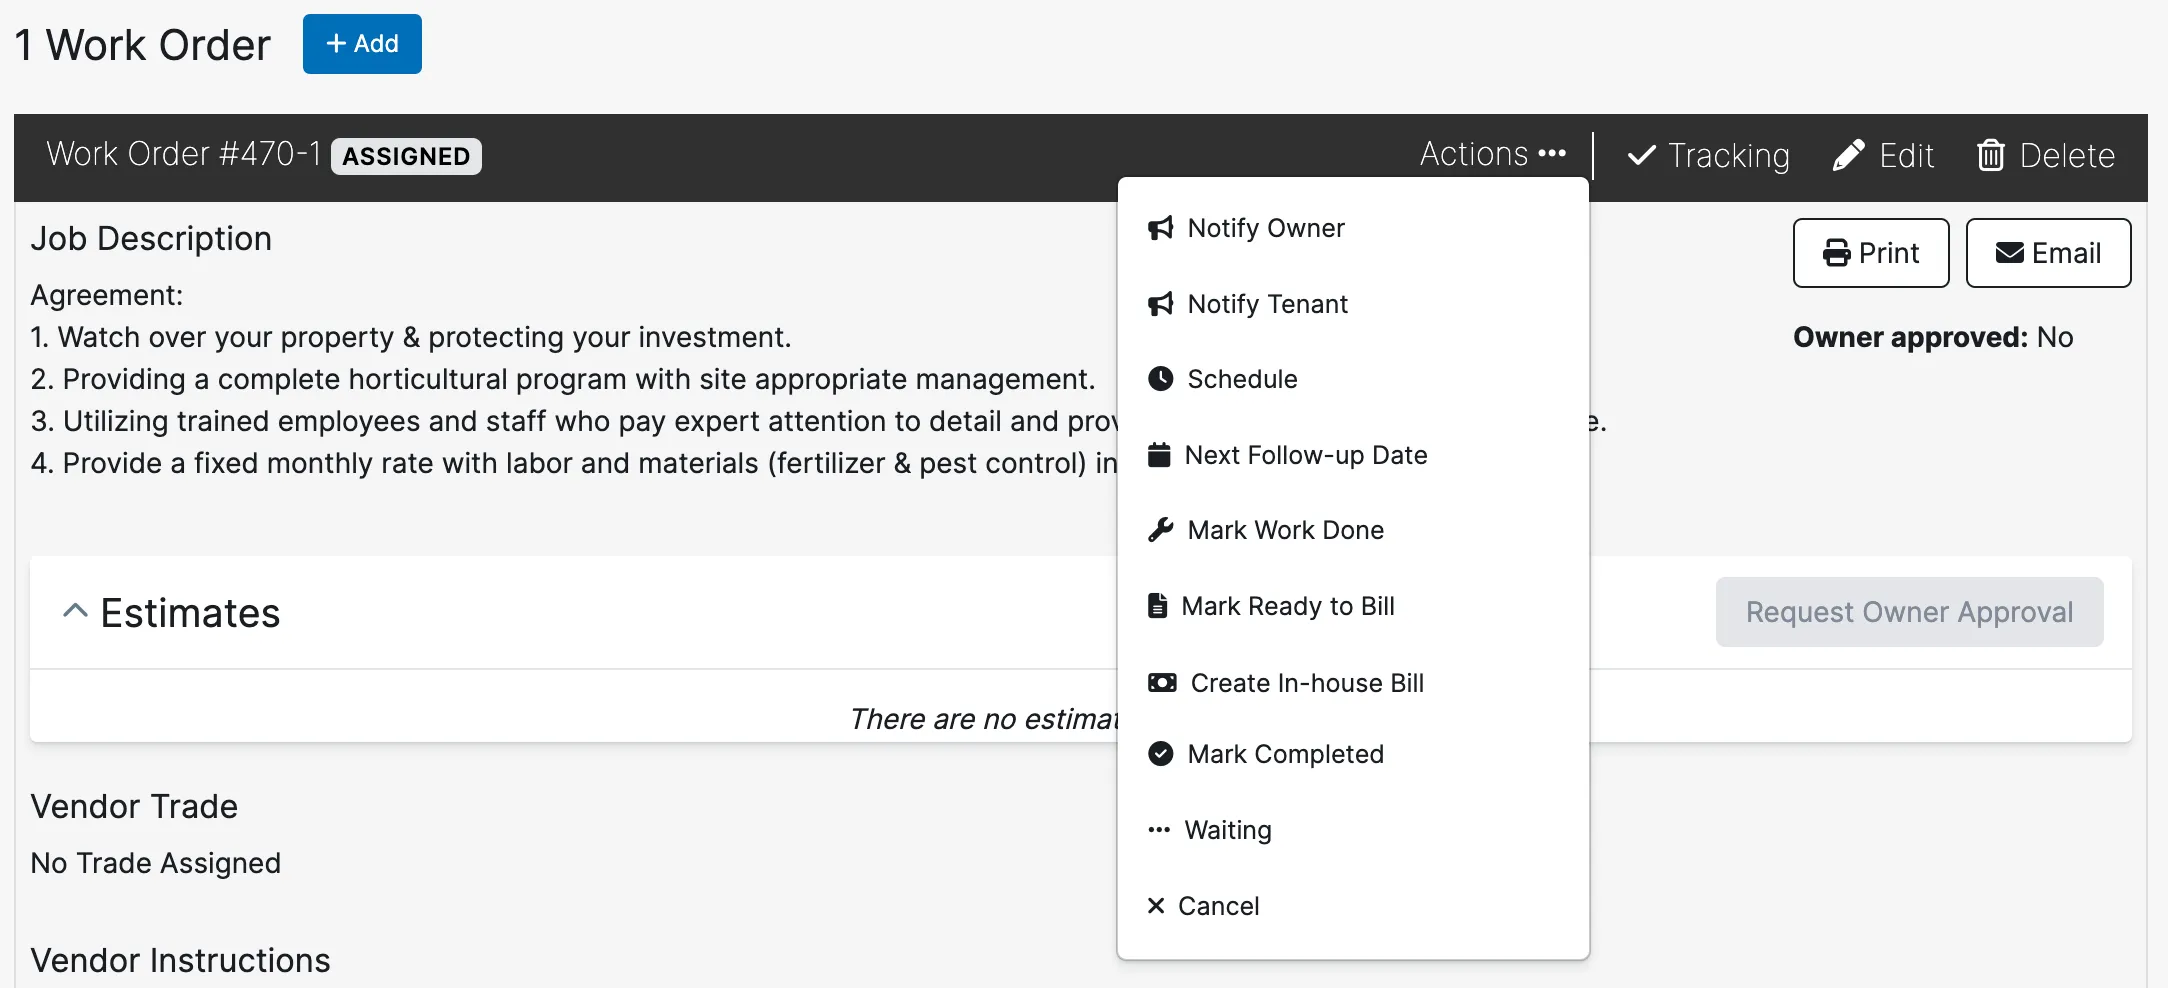
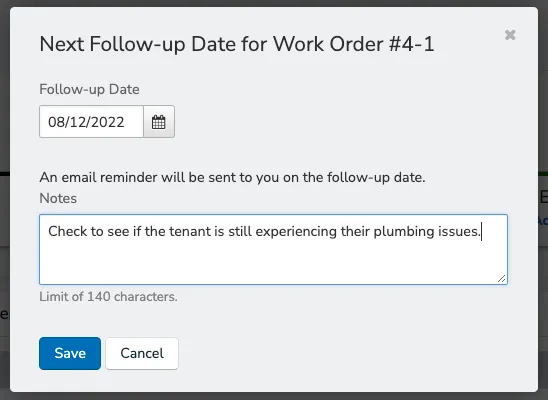
Open a work order and click Actions at the top to see the tasks that update its status. Every action is written to the Actions Log with who did it and when.
Assign to a Vendor
Click Actions > Assign. Enter vendor instructions and pick the vendor or internal user. The status changes to Assigned. Assign appears only while the work order is unassigned; to reassign later, use Edit. You can also assign from the index page quick actions or in bulk.
Schedule
Click Actions > Schedule. Enter the date, start time, and duration. The status changes to Scheduled, a calendar event is created, and the resident sees the date in their portal and email notification (if enabled). This is usually done by the vendor after they coordinate with the tenant.
Mark Work Done
Click Actions > Mark Work Done when the physical work is finished. A maintenance tech or the vendor can also set this from their own view. The work order still needs to be billed and marked Completed to close out.
Bill the Work Order
The vendor emails their invoice to the Smart Bill Entry address. The bill flows through review and approval, and approval closes the work order automatically. See Vendor Billing Closes Work Orders below. This is the path for almost all vendor jobs.
Add the billable items (labor hours, parts, supplies), then click Actions > Mark Ready to Bill. Use Create Bill to review the accounting details and generate the bill. Check Mark this job done during Create Bill to set the work order to Completed in the same step.
Mark Completed
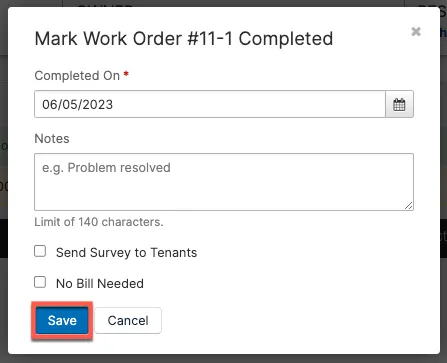
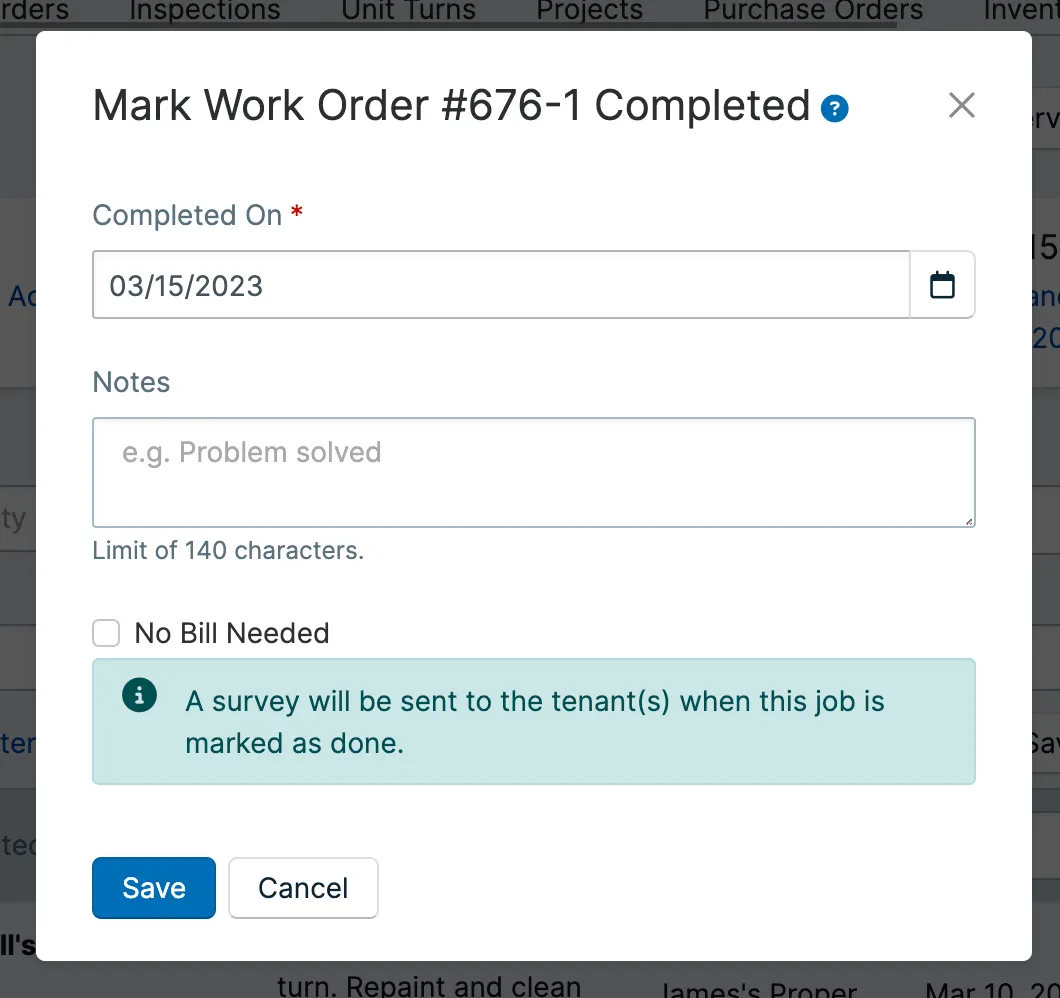
Click Actions > Mark Completed and enter the close-out date, usually after billing. If the job needs no bill, choose No Bill Needed and the status becomes Completed No Need to Bill. For vendor jobs you rarely do this by hand, since the approved bill completes the work order automatically.
Waiting and Cancel
- Waiting: put a work order on hold, add notes, and choose whether to share those notes with the resident’s portal.
- Cancel: cancel a work order and add optional notes for the resident.
Vendor Billing Closes Work Orders
This is the link between work orders and the AP workflow. For vendor jobs, you do not mark the work order completed by hand. The bill does it.
-
Assign the vendor and let them do the work. The work order sits at Assigned or Scheduled.
-
Vendor emails the invoice to Smart Bill Entry. Each completed job goes to the AppFolio Smart Bill Entry address as one invoice per PDF, so splitting is normally not needed. The invoice must show the work order # so Smart Bill Entry can link the bill to the right service request.
-
The bill is reviewed and approved against the work order. Once the bill is approved, AppFolio sets the work order to Completed automatically. No separate completion step is needed.
Work Faster: Bulk and Quick Actions
Bulk Actions
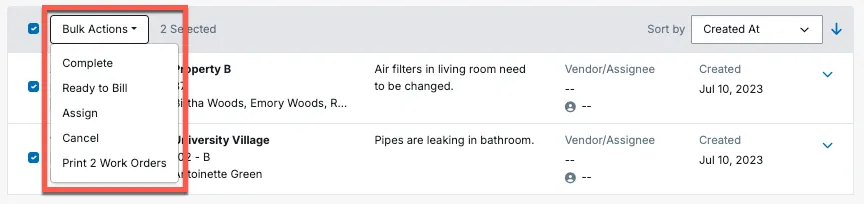
Filter the list, check the boxes next to the work orders you want, then pick a bulk action: Complete, Ready to Bill, Assign, Cancel, or Print.
Quick Actions
Click any row to expand its detail view without leaving the index page. From there use View, Quick Edit, Assign, Mark Completed (only when Assigned), Email, or Cancel.
Work Order Notifications
You choose which work order events notify you, by Email, Mobile Push, or both. Set this per user in My Settings. Notifications are sent only for work orders you are tracking.
Set Your Notifications
-
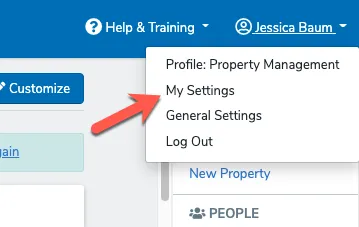
Click your name at the top right of any page, then select My Settings.
-
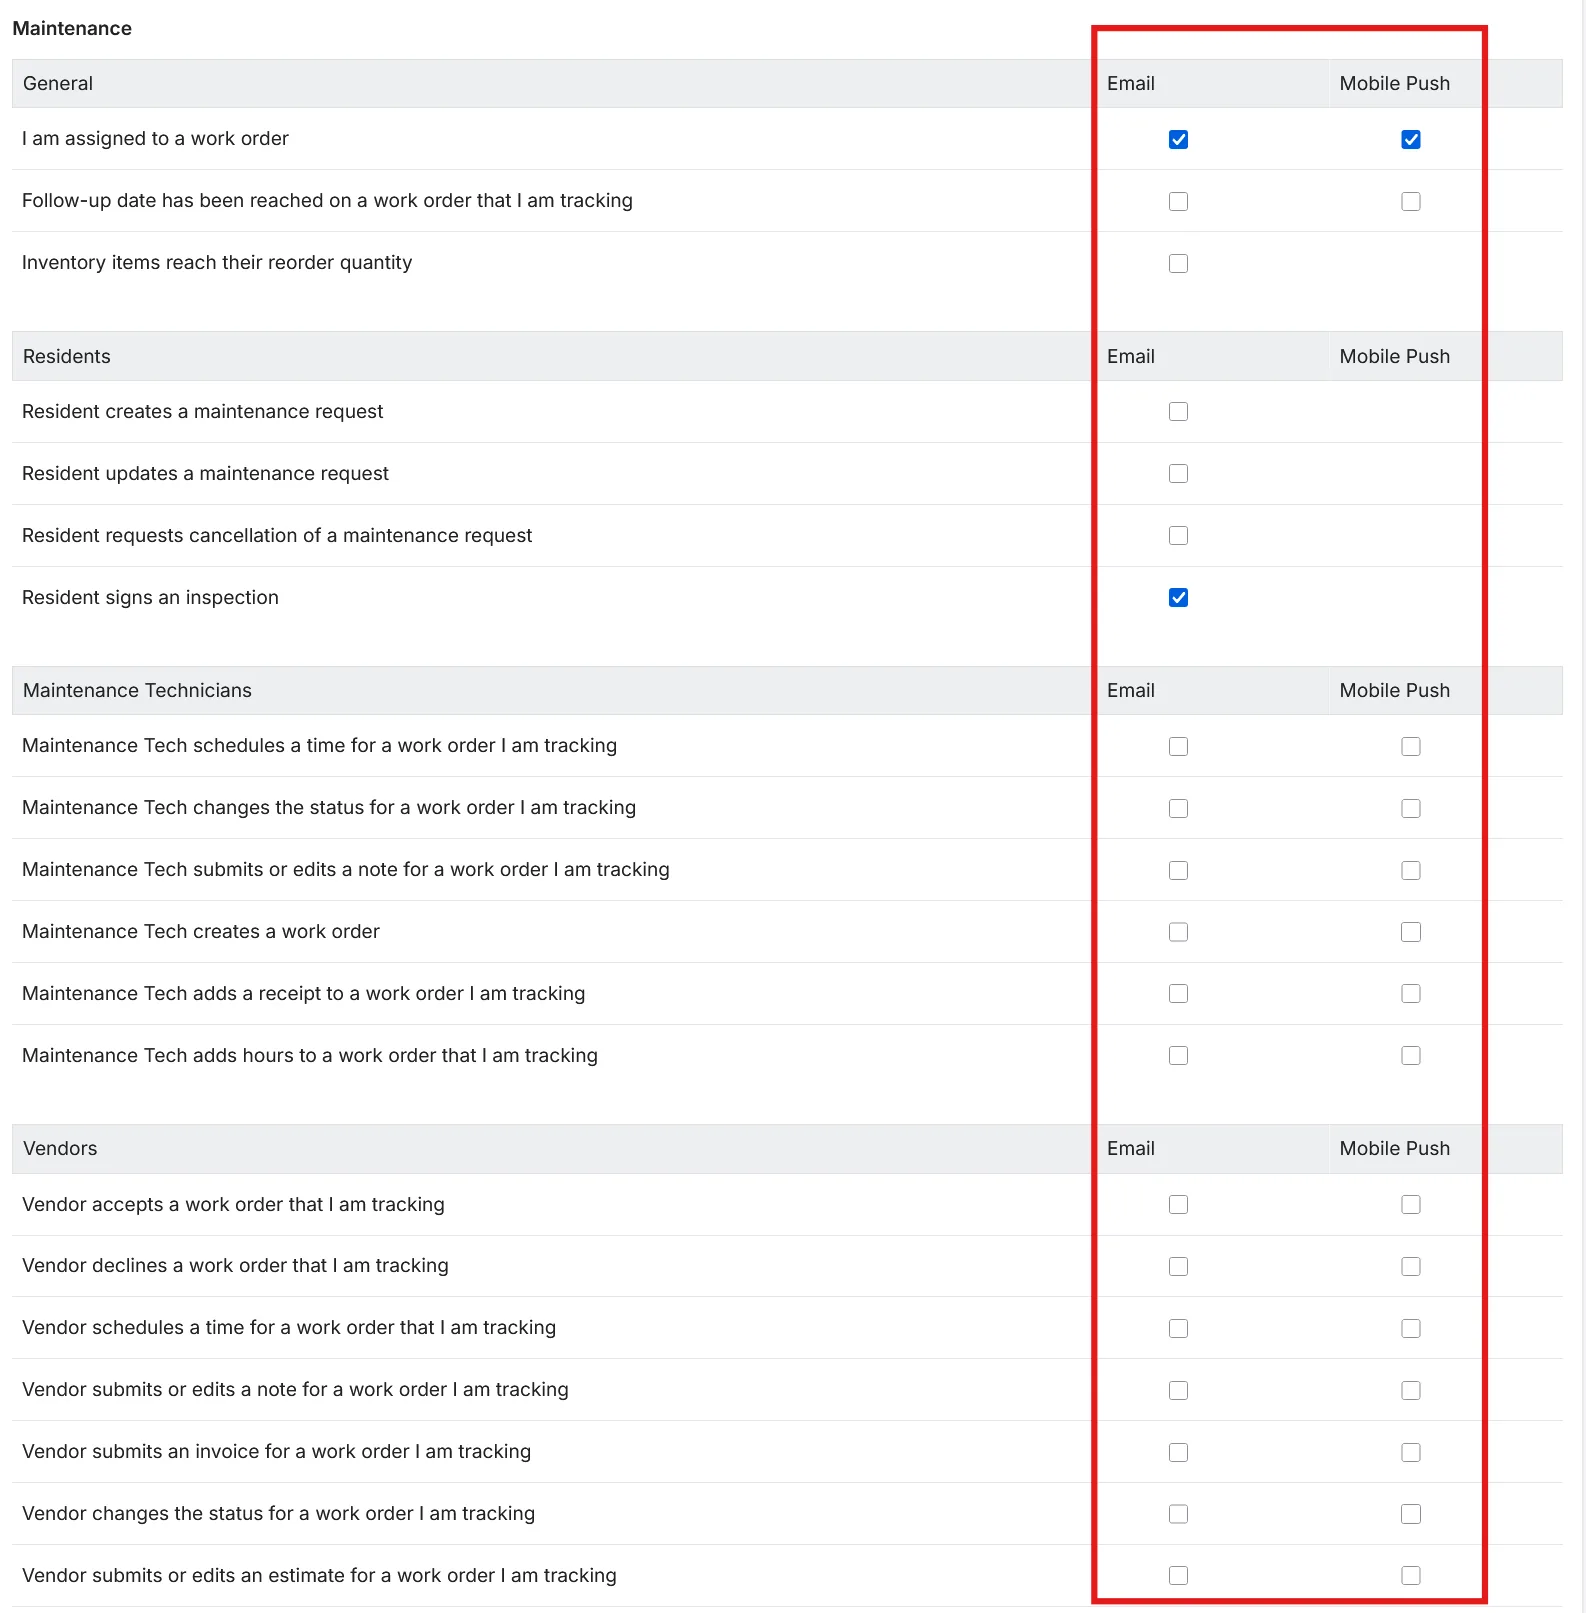
Scroll to the Maintenance section of the Notifications block.
-
Check Email and/or Mobile Push for each event you want. Leave a box unchecked to skip it.
-
Scroll to the bottom and click Save.
Events you can toggle include: online maintenance requests received, being assigned to a work order, a vendor accepting, declining, scheduling, noting, invoicing, changing status, or estimating on a tracked work order, a follow-up date reached, a tenant signing an inspection, and inventory hitting its reorder quantity.
Tracking Work Orders
Notifications only reach you for work orders you track. You automatically track any work order assigned to you. To track others, open the work order and click Track.